Workflow Designer Server (User Manual)
Introduction
The Workflow Designer Server project is a Jetty/Tomcat based web server that provides a visual interface to run and execute workflows created using the Workflow Designer Project.
The Server hosts the following features:
- Drag and Drop Workflow Designer
- Dynamic property configuration
- JAR import
- Workflow import/export
- Job scheduler
- Job tracker
- Multiple User accounts and Access Control
- Remote File browser (OnServer/HDFS)
Setup and Installation
- Build the project
- Create a copy of config.properties.tempate as config.properties in the src/main/resources folder.
- Fill in the configuration of an SMTP mail server
- If you wish to avoid SPAM and are using the project for personal usage, consider using a fake SMTP server like mailtrap.io
- Build the project mvn package. This creates both the jar file as well as the WAR file for tomcat.
- Run mvn jetty:run
- The default port for jetty is 8680 and can be accessed locally at localhost:8680. You should see a similar window.

Usage
Login/Registration:
- Create an account using the registration popup and login to the system. Note email will arrive at the configured SMTP server.
- You can reset your password anytime using the reset option and forgotten passwords can also be recovered.
- Username must be a valid email ID, else verification links will not be received
Importing Jars:
- To draw workflows, we need blocks. These blocks are defined using the workflow designer project. The project needs to be exported to a JAR file with all its dependencies.
- Import the JAR by going to File->Import Library(.jar)
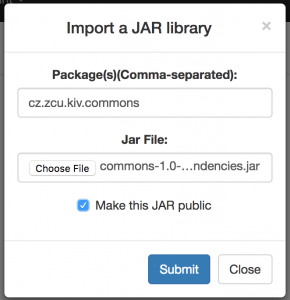
- Make sure you enter the correct package name. If there are multiple packages you want to scan in a single jar separate them with commas.
- Making a JAR public makes the JAR file accessible to all users on the same server. (Note: This cannot be undone)
- On Clicking submit, the file will be uploaded to the server (Note: This may take some time with large JAR files)
- Once done you will receive an alert indicating the number of blocks registered. If it says 0, then it means there is something wrong with your JAR file or the packageName and you can retry.
- Once the upload is complete and blocks are registered, expand the left tree, you should see something similar
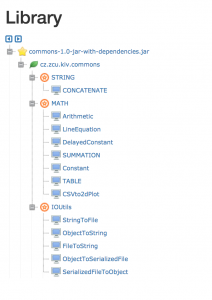
- This indicates the JAR is now ready for use.
Creating Workflows:
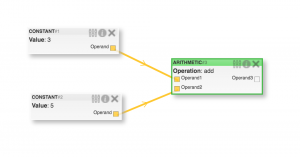
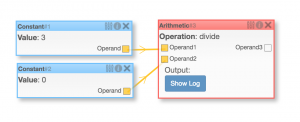
- To create a workflow simply drag and drop blocks from the library onto the canvas. There is no restriction on the number of blocks. To delete a block, select and press delete or use the ‘X’ icon on the top right. Block descriptions are available on clicking the ‘i’ icon.
- Connecting blocks can simply be done by clicking and dragging lines between an input and an output parameter. To delete, select an edge and press delete. Undo/Redo actions are also supported.
- To set the value of the property, double click on the block OR click the
 icon on the block.
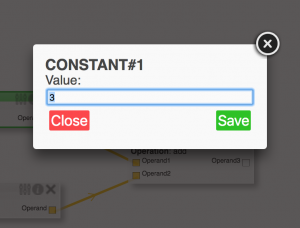
- Blocks can be dragged and rearranged.
- Workflows can be saved and reloaded using the file menu. Workflows are saved as a .json file.
- Array Properties can be configured using the Add/Remove buttons. File selection blocks appear as a ChooseFile button. Click on it to open the file browser.
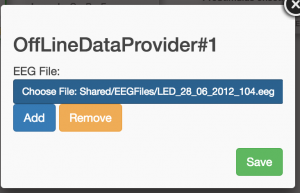
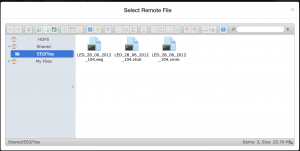
- The file browser also provides Hadoop Integration if the HDFS mounted.
Executing a Workflow:
- To execute a workflow click on the Schedule button
- The status of the job is indicated above the canvas
- When the job is running, the colour of the block indicates the status of the block execution
- Blue Indicates execution is complete
- Red Indicates error in the execution of a job, eventually leads to a failed workflow execution
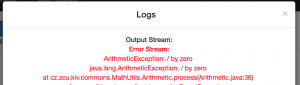
- The show log button on a block displays console output of the block with separated STDout and Error Stream contents.
- You can schedule multiple jobs. You can also exit the browser after scheduling a job.
- Scheduled Jobs are executed in a sequential pattern on a fixed number of threads configured on the server.
- The list of jobs scheduled by you can be visualized from Scheduler->Jobs List
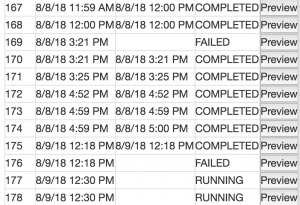
- Previously executed jobs can be visualized using the Preview button
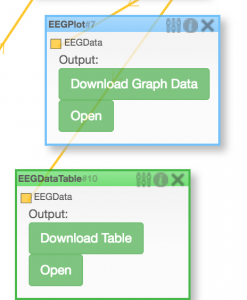
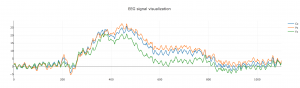
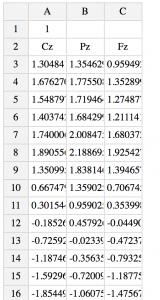
- Complex output types are shown as download/open options on the block